Sunday, 16 October 2016

Character and Narrative - Week 2 Summary

Over the past week we have solidified the story to a good standard, designed our characters further and i started to model the shaman character in Maya since i was happy with the designs. I have learnt a lot already from collaborating with another person, i have learnt that i should be more critical with my ideas and look at them with a level, unbiased opinion to see if they work. Another thing i think is very advantageous when working with others on a project is the fact that everyone's mind works differently and everyone's consciousness is greatly varied which means everyone interprets the world in different ways and therefore thinks about things in different ways and has different thought processes. This has an impact on the whole process of animation but especially idea generation and story development, if each person is open to other's ideas but also clear about what they like and dislike and egos are nonexistent i think its a really productive way to work.

Once i was confident with the designs for the shaman character i decided to start modelling the character in Maya straight away because i want as much time saved for solving problems as possible because i don't know how many problems we are going to have to face at the moment. The modelling process was fairly straight forward although i had to re-do my topology to make the character deform better. Whilst modelling certain tricky parts like the hands and feet, i played around with different ways of modelling them and different topology. When designing the colour scheme for the shaman i realised i knew very little about colour theory so i will need to study that before i go much further.


Sunday, 9 October 2016

Character and Narrative - Week 1 summary

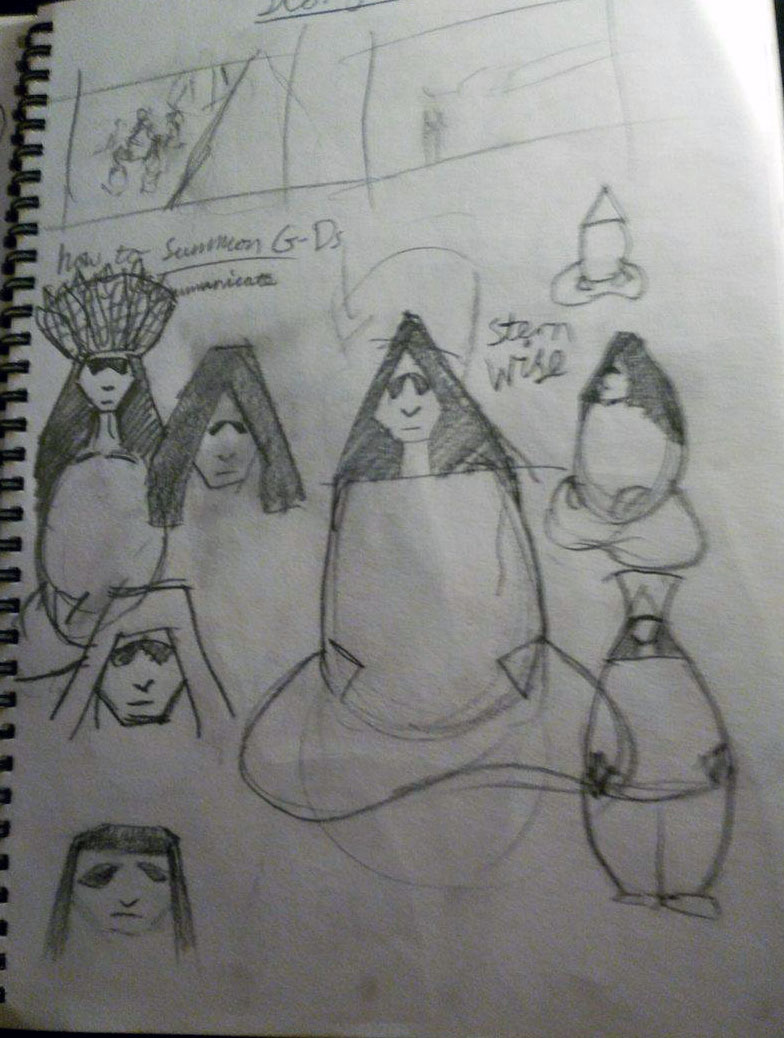
To start the project off we started working on some story ideas based on the starting themes, we chose to focus on the 'a message' theme and started thinking of rituals as a message to higher powers or spirits and narrowed it down to native American rituals, summoning spirits. We were thinking of either doing paint on glass animation or doing CGI in Maya, we decided on Maya because for character animation it is easier to get across the characters emotions and feelings accurately with Maya. We used a whiteboard to get down ideas for the story and the characters, I've been reading books on story development and character design over the past week because i feel like this is my weakest area.

 I think the story and characters are the most important stage of the animation process because its fine to have strong technical skills but if the story is boring and the characters are unimaginative and uninteresting then there isn't really much point in the animation. If the analogy of a tree is used, the story and the characters are the roots and the technical skills and post production are the branches. Since i am working in a team i have had to adapt to working with another person and splitting the workload which i haven't needed to do that much so i thought it would be good to try it out since it's good practice for working in the industry. Once we decided on the characters we each assigned ourselves a character to design, i am designing the Shaman which is the spiritual member of the tribe who can contact the spirits. I made sure to start simply and design the character in terms of basic shapes and i kept in mind that i would be modelling the character in Maya.


Friday, 6 May 2016

Modelling a truck in maya

I found modelling the truck quite helpful for learning the basic tools in maya when i first used it. I really enjoyed the process and made sure i understood everything i was doing. To light the truck i used a spotlight and a directional light, i used the directional light because the right wheel and the bit underneath was blacked out completely so i used the directional light to illuminate those areas slightly to make them visible.

Thursday, 5 May 2016

National Geographic Ident Progress (Maya) - Modeling a Frog

For my national geographic ident i decided to do it in maya because now that i am familiar with the tools and know what i am doing it will take much less time than any other medium. I also enjoy making animations in maya I'm not just doing it because it's quicker. I was quite stuck for what to do for the national geographic ident so i had a think and came up with the base idea of modelling a frog in maya and maybe making it croak and the camera could just pan out from the frog to get the logo in full shot. I thought the simplicity would match the mood of the channel.


Animating a Walk Cycle In Maya

For the animation skills study task we had to animate a pre rigged character in maya. I didn't find this too difficult because i had already become familiar with the animation tools in maya but i probably should have added more overlapping action onto the arms and subtle movements on the body to show the weight shifting. I added overlapping action onto the feet though and the controllers for the feet and legs made it very easy to do so.

Modelling a skull in maya

For my 'Do It Yourself' item i chose to model a skull because i wanted to challenge myself. It wasn't that difficult to model but it was hard to get the brow ridge right and i think i could have done the teeth a lot better. To rotate the skull as a whole i first had to parent all the teeth to their respective part of the skull and then parent the jaw bone to the main skull mesh so then everything moves and rotates together and not separately.


Tuesday, 19 April 2016

E4 Ident Progress (Maya) - Lighting

The default lighting on maya lights the scene sufficiently but it was very boring and there were no shadows. After testing out the types of lights i settled on having a slightly dim ambient light and a directional light.


Friday, 15 April 2016

E4 Ident Progress (Maya) - Animating

I started animating my character, i found it hard to create natural looking movements but next time i will start by blocking out the main poses first and then the breakdowns and in-betweens because my workflow wasnt very good but at least i know for next time. To set keyframes on all the controllers at once i created a script that would select all the controllers for me when i clicked it, this saves a lot of time when animating.


E4 Ident Progress (Maya) - Modelling The E4 Logo

I needed to model the e4 logo so i could put it into my animation so i created a free image plane to put the e4 logo image onto a plane for reference and started modelling from a cube, because this model isn't going to be deformed the topology doesn't matter too much.


E4 Ident Progress (Maya) - Creating Further Elements For The Scene

As part of my animation my character needs a clipboard so i modelled a basic clipboard using the bevel tool and smoothing tool. For the paper texture i screens hotted an old word document and used that as the texture. To put the texture on the paper i used the planar mapping tool to project the face in the y axis because thats the way the face was facing and applied the texture material to that face.


I used a similar process for creating the blackboard.


E4 Ident Progress (Maya) - Adding Facial Expressions To My Character

I realised my character needed to be able to have a few different facial expressions to make him more believable. I thought about giving the eyes aim constraints but i don't think the eyes need too much motion but i need him to have different expressions. To do this i used the blend shape tool which allowed me to duplicate the mesh and edit the expression and then create an attribute with that expression for my character. I really like this feature in maya, i think its really useful and can be used in a lot of different useful ways.


E4 Ident Progress (Maya) - Building The Set

I created the set by scaling up a cube and deleting one of the faces so i had a room for the animation to take place in, i then created a quick desk/table and a small drawer to fill the scene abit more. I then gave the drawer, the table and the shelf a wood texture and gave the room a colour also.


E4 Ident Progress (Maya) - Building The Scene

Now that my character is pretty much completed i need to start building the scene. I started by building a simple flask and finding out how to add a realistic glass texture to it, this was alot easier than i thought, all i needed to do was to create a mia material and there are some glass types to choose from under the presets. After tweaking the attributes of the material i rendered the flask with mental ray to see what it looked like.

 
I created a beaker and wanted to make it look like it had liquid in it so i created a cylinder with a purl colour and placed it inside the beaker, with the glass texture applied to the beaker it made the cylinder look like it was a still liquid.


Thursday, 14 April 2016

E4 Ident Progress (Maya) - Changing Shirt Texture

I thought my Scientist character didn't look much like a scientist so i decided to alter the shirt texture to make it look more like a work shirt rather than just a t-shirt.


Friday, 8 April 2016

E4 Ident Progress (Maya) - Painting Weight Influences

With the controllers working the skeleton was moving correctly so the next step was to combine the mesh to the skeleton. I did this by selecting the skeleton and the mesh and applying a smooth bind from the skin menu under the animation menu set. My mesh was now attached to the skeleton but the mesh was not moving well with the skeleton as some verts from the hand would be connected to the torso or leg for example so whenever the hand would be moved, certain verts would not move with the hand and would instead stay put stretching the mesh of the hand. To solve this problem i used the paint skin weights tool to alter how much certain vertices are weighted down to each bone.

I didn't find this process particularly hard but it was very time consuming and i had to go over each joint multiple times to make sure every part of my character was moving as it should. An important part of this process was putting my character in extreme positions to test the model to make sure it is capable of a wide range of positions. The biggest problem that i had was the elbow joints, because of the way i had modeled it the elbow joint was right at the adjacent polygon intersections of the sleeve to the arm. This made the elbow polygons deform unrealistically, i played around painting the skin weights and figuring out the best arrangement of skin weights for the elbow so it didn't deform too badly but at least i know for next time to pay attention to areas that will be deforming when modelling and also adding more edge loops to these areas. i had a few other problems but i worked out solutions for them.

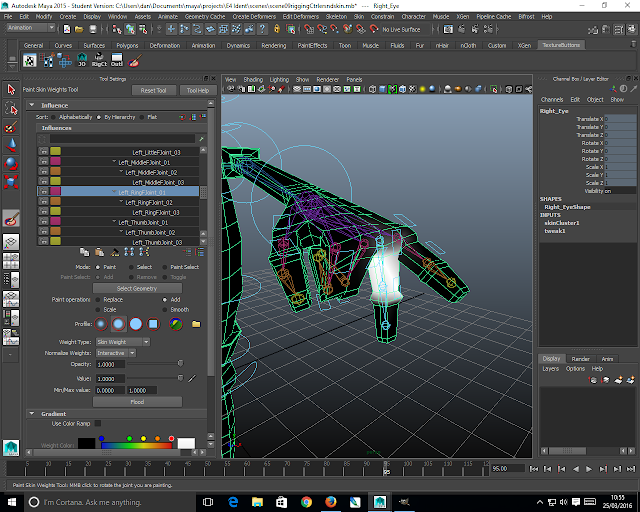
For some unruly vertices and when there were vertices that were hard to paint i used the component editor to manually input the weight values of the vertices to each bone. The total value for each vertex is 1 but this value is split up to different bones. To fix vertices i had to change the values so that the bone the vertex was meant to be attached to has a higher percentage weight influence than the other bones.