Tuesday 19 April 2016

E4 Ident Progress (Maya) - Lighting

The default lighting on maya lights the scene sufficiently but it was very boring and there were no shadows. After testing out the types of lights i settled on having a slightly dim ambient light and a directional light.


Friday 15 April 2016

E4 Ident Progress (Maya) - Animating

I started animating my character, i found it hard to create natural looking movements but next time i will start by blocking out the main poses first and then the breakdowns and in-betweens because my workflow wasnt very good but at least i know for next time. To set keyframes on all the controllers at once i created a script that would select all the controllers for me when i clicked it, this saves a lot of time when animating.


E4 Ident Progress (Maya) - Modelling The E4 Logo

I needed to model the e4 logo so i could put it into my animation so i created a free image plane to put the e4 logo image onto a plane for reference and started modelling from a cube, because this model isn't going to be deformed the topology doesn't matter too much.


E4 Ident Progress (Maya) - Creating Further Elements For The Scene

As part of my animation my character needs a clipboard so i modelled a basic clipboard using the bevel tool and smoothing tool. For the paper texture i screens hotted an old word document and used that as the texture. To put the texture on the paper i used the planar mapping tool to project the face in the y axis because thats the way the face was facing and applied the texture material to that face.


I used a similar process for creating the blackboard.


E4 Ident Progress (Maya) - Adding Facial Expressions To My Character

I realised my character needed to be able to have a few different facial expressions to make him more believable. I thought about giving the eyes aim constraints but i don't think the eyes need too much motion but i need him to have different expressions. To do this i used the blend shape tool which allowed me to duplicate the mesh and edit the expression and then create an attribute with that expression for my character. I really like this feature in maya, i think its really useful and can be used in a lot of different useful ways.


E4 Ident Progress (Maya) - Building The Set

I created the set by scaling up a cube and deleting one of the faces so i had a room for the animation to take place in, i then created a quick desk/table and a small drawer to fill the scene abit more. I then gave the drawer, the table and the shelf a wood texture and gave the room a colour also.


E4 Ident Progress (Maya) - Building The Scene

Now that my character is pretty much completed i need to start building the scene. I started by building a simple flask and finding out how to add a realistic glass texture to it, this was alot easier than i thought, all i needed to do was to create a mia material and there are some glass types to choose from under the presets. After tweaking the attributes of the material i rendered the flask with mental ray to see what it looked like.

 
I created a beaker and wanted to make it look like it had liquid in it so i created a cylinder with a purl colour and placed it inside the beaker, with the glass texture applied to the beaker it made the cylinder look like it was a still liquid.


Thursday 14 April 2016

E4 Ident Progress (Maya) - Changing Shirt Texture

I thought my Scientist character didn't look much like a scientist so i decided to alter the shirt texture to make it look more like a work shirt rather than just a t-shirt.


Friday 8 April 2016

E4 Ident Progress (Maya) - Painting Weight Influences

With the controllers working the skeleton was moving correctly so the next step was to combine the mesh to the skeleton. I did this by selecting the skeleton and the mesh and applying a smooth bind from the skin menu under the animation menu set. My mesh was now attached to the skeleton but the mesh was not moving well with the skeleton as some verts from the hand would be connected to the torso or leg for example so whenever the hand would be moved, certain verts would not move with the hand and would instead stay put stretching the mesh of the hand. To solve this problem i used the paint skin weights tool to alter how much certain vertices are weighted down to each bone.

I didn't find this process particularly hard but it was very time consuming and i had to go over each joint multiple times to make sure every part of my character was moving as it should. An important part of this process was putting my character in extreme positions to test the model to make sure it is capable of a wide range of positions. The biggest problem that i had was the elbow joints, because of the way i had modeled it the elbow joint was right at the adjacent polygon intersections of the sleeve to the arm. This made the elbow polygons deform unrealistically, i played around painting the skin weights and figuring out the best arrangement of skin weights for the elbow so it didn't deform too badly but at least i know for next time to pay attention to areas that will be deforming when modelling and also adding more edge loops to these areas. i had a few other problems but i worked out solutions for them.

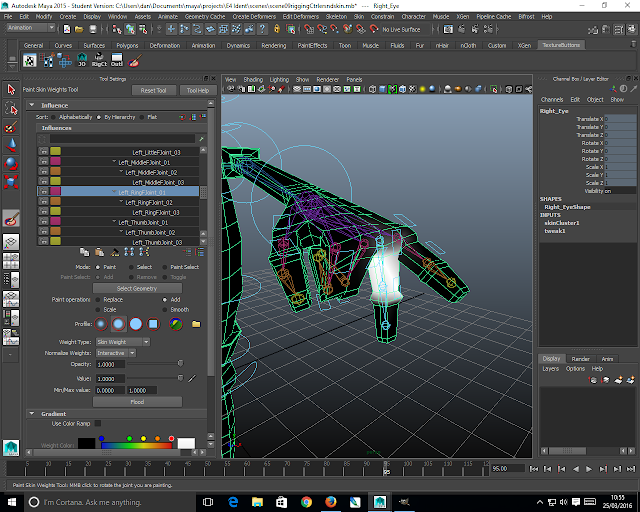
For some unruly vertices and when there were vertices that were hard to paint i used the component editor to manually input the weight values of the vertices to each bone. The total value for each vertex is 1 but this value is split up to different bones. To fix vertices i had to change the values so that the bone the vertex was meant to be attached to has a higher percentage weight influence than the other bones.


Wednesday 6 April 2016

E4 Ident Progress (Maya) - Adding Controllers To My Character

After i rigged my character and made sure all the joints were oriented correctly i then started on the controllers for the joints. These controllers are what i am going to use to pose my model for animating. To position the controller accurately with the joint's axis i created a group for the controller and parented the group to the joint, then i zero out the translation values and the controller is now aligned with the joint's axis. This works because the group adopts the values of the joint in relation to where the group is so when the translation values are zeroed out it returns to the joint's location. the actual controller can be moved wherever as long as the pivot point of the controller is still in the middle of the joint. I then used an orient constraint to connect the controllers to the joints.
To make the joints move properly with each other i used the outliner to parent the controller groups to joints higher up the hierarchy. The fingers and the feet are at the bottom of the hierarchy whereas the root joint where everything is connected to is at the top of the hierarchy.